Pests & Disease
by Don Hollingsworth, APS Director - Maryville, Missouri in cooperation with the Canadian Peony Society.
Photos & editing by Reiner Jakubowski
The food storage roots of well-grown healthy peonies will generally by symmetrical in outline and in cross section, smooth of surface. If there are branch storage roots, expect them to be smaller but otherwise similar. Also, by late summer, as we get into digging season, expect the current year feeder roots (those which have not taken on food storage character) to be mostly gone. New white feeder roots will be showing on peonies dug in later autumn when cool moist soil enables the next growth cycle to get underway. Peony roots showing distortion of growth may signal disease.
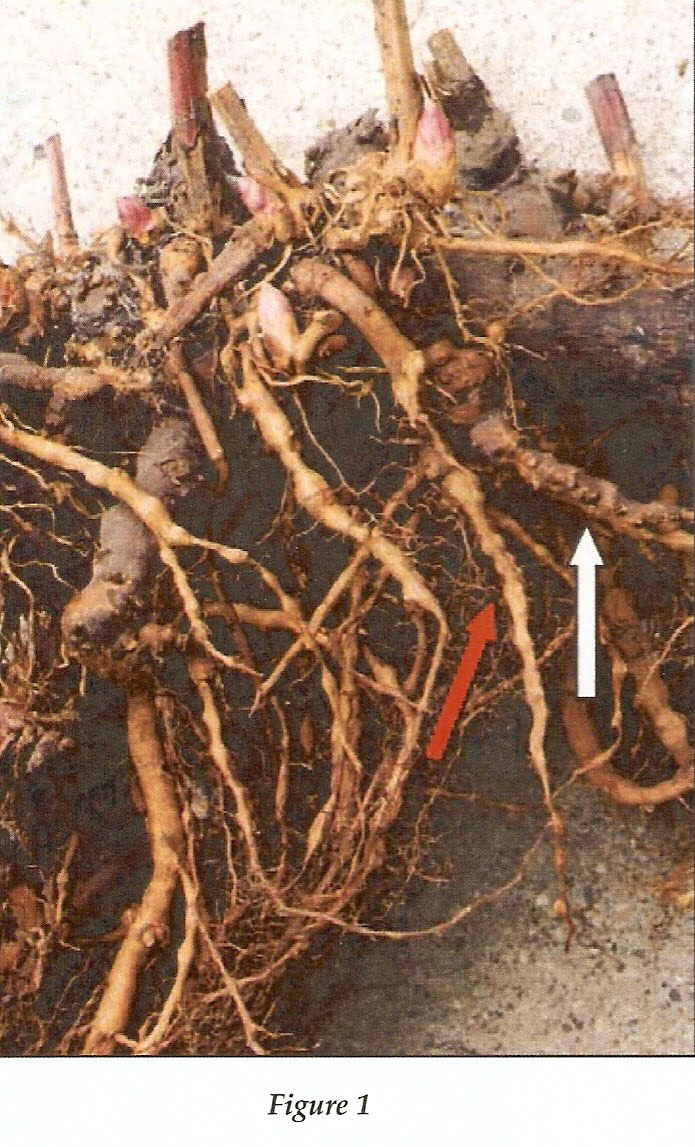
When cleaning peony roots for processing, seeing sequenced lumps of varying sizes that are interrupting the expected straight surface suggests Lemoine Disease (Figure 1, red arrow). Confirm the diagnosis by cutting across a lump.
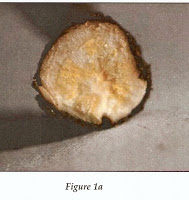
On the exposed face of the cut will be seen an irregularly shaped inclusion, usually surrounded by healthy tissue (Figure 1a). The inclusion color will be light-yellow, of smooth texture. Normal tissue is an opaque milky-white, rich with starch. The infected plant may or may not be suspected unless looking at the roots upon being dug and cleaned.
Known only in peonies, I find no modern plant pathology research on Lemoine Disease. The name "Lemoine Disease" was given by early growers upon finding it in plants received from Europe. Not all plants are affected alike. For example, insofar as I am aware there is no stock of peony (lactiflora) ALICE HARDING that is free of Lemoine symptoms, nevertheless the plant is very vigorous and flowers beautifully. Another peony lifted because of poor growth was found to be in the last stages of deterioration, the roots "pitted" where the infection sites had become open to the surface (Fig 1 above -White arrow- the onset of pitting)
In the past, virus origin was speculated. But what is the vector? In 40 years I have never seen evidence of natural transfer between adjacent plants. Close trimming to eliminate symptoms has never yielded a healthy plant for us. With few exceptions, plants found infected here got to incineration or landfill. The exceptions are plants held for breeding interest, there being no evidence of transmission through seeds. My observations lead me to conclude transfer is largely or entirely by mankind in sap residues on cutting tools. Sanitation is essential. We routinely dip cutting tools in ordinary rubbing alcohol as a disinfectant upon finishing each essential. We routinely dip cutting tools in ordinary rubbing alcohol as a disinfectant upon finishing each plant.
Root Knot Nematode
Meloidogyne Hapla
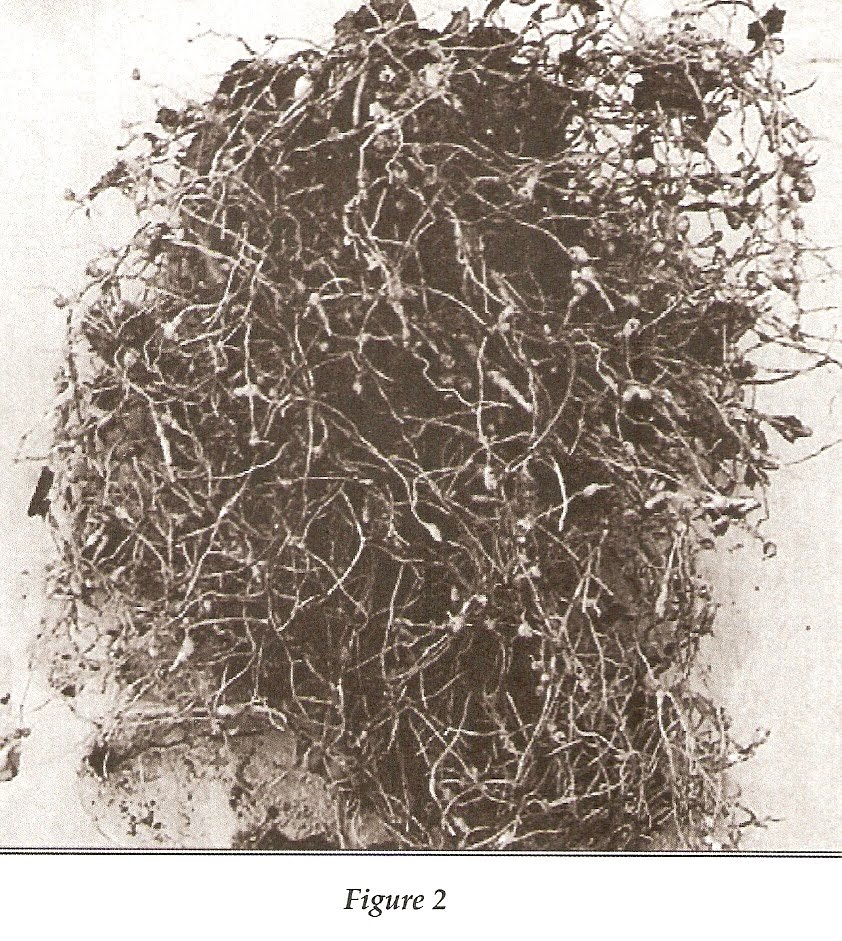
Unlike Lemoine lumps, root knot nematode infestation is typically first noticed upon seeing much-branched feeder roots bearing small galls (figure 2).
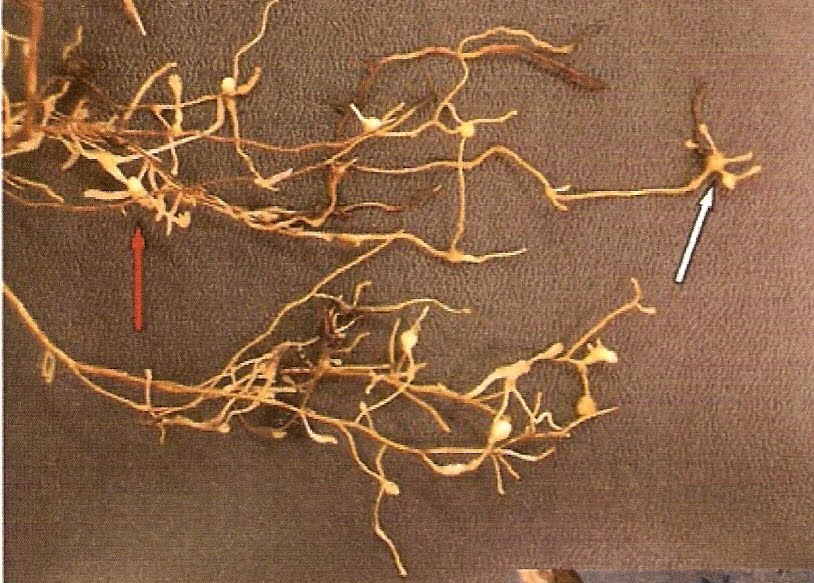
Each gall is a "ball" of root tissue which has grown around one or more living parasites. Branching results when the root tip is destroyed (fig 3, white arrow). Later in autumn on rootlets of the new cycle, the symptoms will be first noticed as a thickening, the branching and crooking may already be present. (fig 3, red arrow)
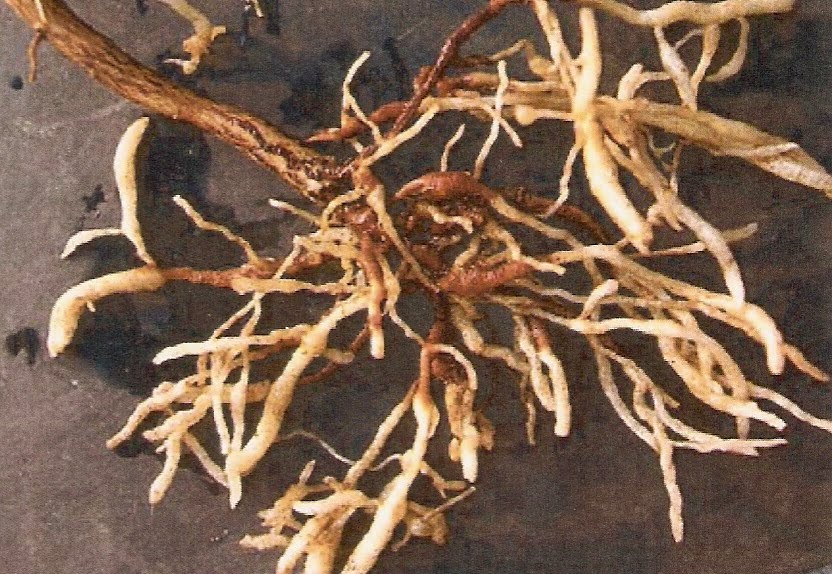
Figure 4 Infestation builds with egg-layering females, rootlets become much-branched and present themselves as 'wads' of rootlets. Root-knot nematodes are suppressed in clay soil where air spaces are small. When surviving only close to the surface they are vulnerable to winter frost. Sandy soils are deeply well aerated, enabling them to succeed at greater depth where there is protection from severe winter cold.
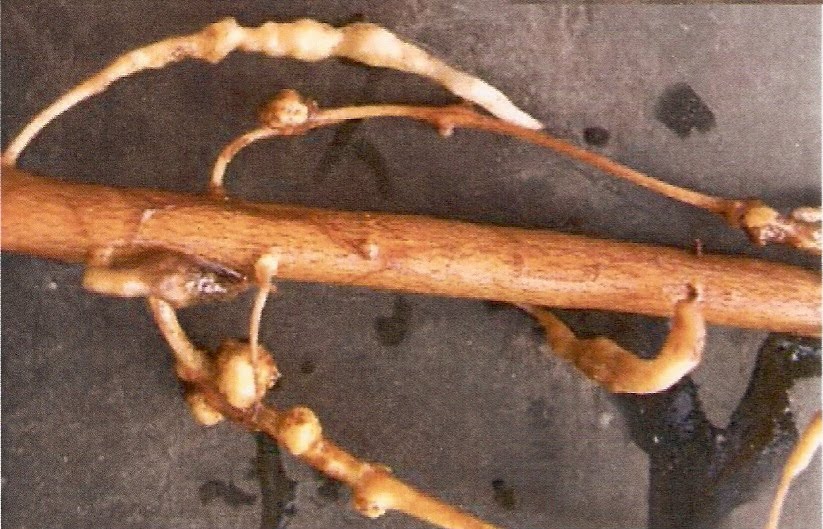
Severe infestations usually develop over two or more seasons. Plants will become sickly, the stems remaining thin and short, flowering fails. Accordingly, when properly planted peonies are not growing as expected it makes sense to inspect roots by taking up sample plants for diagnosis. Second season infection often shows what might be called side galls because the imperfection will show on only one side (Fig.5).
When a malady is found the first concern is to practice careful sanitation. Contain the roots and adjacent soil so they can be removed from the premises without spreading contamination. This is where that old and persistent rule, "never replant a peony without replacing all of the soil", gains credibility. It makes no sense to put a new division into a nest of corruption. If in doubt whether the site can be successfully cleaned, grow a plant that is not susceptible for three years or more. True grasses are generally not susceptible. No known chemical treatments labelled to control root knot
Figure 5 Second season infection shows side galls nematodes are available to home gardeners.
The female root knot nematode is an obligatory and sedentary parasite. "Obligatory" in that is cannot mature nor reproduce unless it successfully parasitizes a host; "sedentary" means it becomes stationary. The nematode is genetically endowed to invade the physiology of the host plant, alter the root growth pattern around it, but is then unable to move. To accomplish this, the offspring, tiny nymphs that can move perhaps a couple of inches under their own power, must enter a growing root tip where the cells are dividing. The parasite retards the plant by preventing normal root reach, limiting water uptake, mineral uptake and competing for nutrients that would otherwise be used by the plant.
How do these tiny nymphs get spread greater distances? On infested planter pieces, in soil sticking to tools, on shoes, or animals and in run-off water. So, pay attention not only to your own plants, but also to the plants you may obtain from other gardeners or commercial sources.
The next issue is whether to try saving an infested plant. It can usually be done. The first step is to wash the roots free of soil on a grassy spot where the runoff drains away from growing areas. Remove all small roots at their point of origin - this is normal practice anyway - with the caution that infected waste needs to be carefully contained and destroyed. That takes care of the easy part.
Examine larger storage roots for any surface irregularities that might signal embedded older nematode galls. Nematode sites incorporated into bigger roots will have also grown larger with secondary infestation. Cut away root sections showing large irregularities. Small imperfections may be cored out, including any internal specks of discoloration. One member of any forked pair of roots should be removed, the point of separation examined, discoloured tissue removed.
Underground peony anatomy is made of two primary organs. One is stem tissue (the crown), the other is the roots. New root growth can come from either, but the nematode can only parasitize at the actively dividing cells of a growing root tip. True crown tissue is inherently without root-knot parasites, although nymphs can be carried on the surface and a good scrubbing may be helpful. Because the crown of a well-known peony plant normally contains substantial stored food, it is possible to produce planter pieces without support from true roots. One may also graft crown buds onto nematode free roots for added strength. Thus an observant and careful gardener may clean up infested stock and grow nematode free plants. Part of prudence will be to grow the plants in a quarantine area for the first cycle so they can be examined again before lining out with other stock.
For additional information, obtain the American Peony Society's publications Handbook of the Peony, see pages 70-86, and APS, 75 Years see Chapter 4, Diseases and Pests.
Botrytis paeoniae
A fungal disease more prominent especially in very wet seasons. The stems of your plant develop cankers or blacken at the base and fall over or simply wilt. Leaves may show black or brown patches and buds may turn brown and fail to open. Good culture and sanitation in the garden can help prevent or correct these problems. Plants need good drainage and air circulation, so do not crowd. Remove any affected foliage at the first sign of disease and deadhead religiously, removing all flower parts and petals from the garden. Cut off all foliage just below soil level after a killing frost in the fall and remove it and any debris from the area -- do not compost. If botrytis was present the previous spring, add a shallow layer of sand around the plants and crowns. Fungal spores overwinter at the base of the plants, and spring rains then splash the spores up onto the new shoots. Removing any debris and old foliage and covering the soil with sand helps prevent reinfection.
Life Cycle
Botrytis fungi are both saprophytic and parasitic. The spore-producing structures of the fungus develop along the base of the rotting stalks and survive in debris left in the garden over the winter. In the spring, spores form and spread to dying, wounded, or extremely soft plant tissues. As the disease progresses, a gray mold develops. The gray mold is made up of spores that are either wind-blown or splashed onto new tissues and infect.
Phytophthora cactorum
Another blight may also appear, but the two diseases are hard to tell apart, this disease is usually fatal to the plant and infected plants should be dug up and destroyed, and the soil replaced before replanting.
Diseases of Herbaceous and Tree Peonies
by Serge Fafard, Les Jardins Osiris
The most common diseases of peonies are:
- Cladosporium paeoniae – this causes brown spots on leaves which appear after the bloom.
- Botrytis paeoniae – This produces gray mould on both tree and herbaceous peonies
- Phytophthora cactorum – a fungal disease which turns stems of herbaceous peonies black and eventually kills them.
- Powdery mildew – this disease produces a white powdery film on the surface of leaves, generally after flowering.
- Verticillium – this causes peonies to wilt.
To avoid diseases, prevention is the best solution.
- Always plant your peony roots in well-drained soil and try to build the soil up a little on top of the peony so that rainwater runs off and does not accumulate in a dip in the soil. If water accumulates around the peony roots, they will rot. Leave sufficient space between peonies so that air can circulate properly as this will reduce the incidence of mildew.
- Keep the peony clean all summer long by taking off any leaves and flowers showing signs of disease. In the fall, cut all of the stems of herbaceous peonies at about 5 cm above soil level, and throw them in the garbage. Do not ever compost any peony debris, as you risk spreading fungal diseases.
- Don’t fertilize with high levels of nitrogen as peonies prefer more potash, which stimulates flowering instead of fast green growth.
- Don’t put straw or compost up next to the stems of peonies because too much humidity in that area from either product will cause Botrytis to spread.
Treatment
- In the spring, even before seeing any sign of disease, you should take preventative measures.
- As producers, we have permission from the Minister of Agriculture to use various systemic products such as Captan, Royral and Senator. We use them rarely, preferring to use biological controls.
- For those who do not have a permit from the Minister of Agriculture, you could use Safer’s Defender or Bordeaux by Wilson.
- To combat Powdery Mildew, there are always the old, traditional methods that our ancestors used, such as urine on the foliage, but the smell it leaves behind is very disagreeable! Spraying a mixture of milk and water – one part 3.25% milk with five parts water might be preferable. Alternatively, you can spray with a mixture of bicarbonate of soda and water – 1 tsp of bicarbonate of soda, ½ tsp of liquid soap, 4 litres of water.
- I’d like to mention as well something I use which is rarely mentioned when talking about treating fungal problems in peonies. It’s iodine – the type which is sold to farmers to cleanse the vats and all of the pipes used for storing and transporting milk. I get mine from Laboratoires Ultrateck, but it can be purchased from any vendor of this type of iodine.
To treat many diseases such as blackened buds, wilting, mildew or airborn botrytis, I use a foliar spray made up of 3ml of iodine to 20 liters of water. If the problem is on the roots, you have to soak the plant with a large quantity of liquid (the same proportions as set out above) so that it will destroy fungal problems on the roots. Pour the solution on slowly and allow to penetrate well.
I find Iodine is also very useful in treating nematodes. Nematodes (Meloidogyne) are microscopic worms which attach themselves to peony roots and which cause a decline in health over time. As the years pass, the stems become shorter and shorter, the flowers become smaller and paler, and the size of your plant shrinks. Nematodes love sandy, poor soil. We soak plants suspected of having nematodes in the same way as we do peonies with root problems, as mentioned above.
Pivoines arbustives et herbacées - Les maladies
by Serge Fafard, Les jardins Osiris
Les maladies les plus courantes sont :
- Cladosporium paeoniae : Taches brunes sur les feuilles sur les pivoines herbacées et arbustives, après la fleuraison.
- Botritis paeoniae : Pourriture grise chez les pivoines arbustives et herbacées.
- Phythophthora cactorum: Mildou qui fait mourir les tiges des pivoines herbacées.
- Le Mildiou poudreux produit une couche grise poudreuse sur la surface des feuilles.
- Verticillium: Flétrissement chez les pivoines arbustives et herbacées.
Pour éviter les maladies, la prévention est le meilleur moyen pour éliminer tous les types de champignons.
- Toujours planter dans un sol bien drainé, il faut que la pivoine soit sur une partie convexe du sol et non concave. Il ne faut pas que le surplus d’eau s’accumule à la base car la pivoine n’aime pas les sols trop humides.Un bon espacement entre les plants est aussi recommandé, une bonne circulation d’air aide beaucoup à réduire le mildiou.
- Nettoyer la pivoine tout au long de la saison en lui enlevant toutes les parties sèches autant le feuillage que les fleurs fanées après la floraison. À l’automne coupé toutes les tiges des pivoines herbacées (à 5 cm du sol) et les jeter aux poubelles et non pas au compost. (Elles peuvent provoquer des maladies fongiques dans le compost.)
- Éviter les engrais à trop forte quantité d’azote, la pivoine préfère les engrais avec plus de potasse, ce qui stimule la floraison.
- Éviter de mettre le paillis ou le compost près du pied des pivoines, car le paillis garde trop d’humidité et provoque du Botrytis. Quant au compost, en plus s’il n’est pas suffisamment composté, il peut lui aussi provoquer du botrytis.
Les Soins
- Au printemps, avant même qu’apparaissent les premiers signes de maladies, il est recommandé de faire quelques applications préventives. Par la suite, si le temps est humide il faudra répéter une fois à l’été et une autre à l’automne.
- Pour faire ces applications, ceux qui ont un permis du Ministère de l’Agriculture peuvent utiliser des produits systémiques comme le Captan, le Rovral, et le Senator.
- Pour ceux qui ne possèdent pas de permis, vous pouvez utiliser des produits biologiques ( ou presque) qui sont en vente libre. Je vous suggère le ‘Defender’ de la compagnie Safer’s ou bien le ‘Bordeaux’ de la compagnie Wilson.
- Pour combattre le mildiou poudreux ( feuillage devenant tout gris durant la saison, avec une fine couche de poudre) il reste toujours les anciennes méthodes que nos ancêtres utilisaient soit l’application d’urine sur le feuillage avec un inconvénient majeur soit la mauvaise odeur. Ou bien l’application de lait soit une partie de lait 3,25 % pour cinq parties d’eau. Ou encore l’utilisation de bicarbonate de soude (de la petite vache), 1 cuillère à thé de bicarbonate de soude, 1\2 cuillère à thé de savon liquide, mélangé avec 4 litres d’eau.
- J’aimerais mentionner un autre produit dont on parle rarement et que j’utilise fréquemment pour soigner toutes les maladies des pivoines. Ce produit c’est l’iode.Cet iode est le même qui est vendu aux agriculteurs pour nettoyer les cuves à lait ainsi que toute la tuyauterie utilisée pour la traite des vaches laitières. En ce qui me concerne je me procure mon iode à la compagnie ( Laboratoires Ultratek).
Pour traiter les maladies comme la rouille des boutons, le flétrissement, le mildiou ou le botrytis aérien, j’utilise l’iode de façon foliaire. Je dilue 3 ml d’iode dans 20 litres d’eau que j’applique (en spray) sur le feuillage des pivoines malades.Pour ce qui est du Botrytis qui est aux racines des pivoines, il faut traiter par immersion, c’est-à-dire verser une grande quantité de liquide (3 ml d’iode par 20 litres d’eau) pour que celui-ci pénètre le plus profondément possible afin de détruire les champignons des racines.
L’iode est aussi très efficace pour éliminer les nématodes. Les nématodes (Meloidogyne) ce sont des vers microscopiques qui s’attaquent aux racines des pivoines et qui peuvent causer sa perte à long terme. L’action des nématodes est favorisée par des sols légers et pauvres, donc sablonneux. Voici les symptômes qui pourraient vous indiquer que votre plante est attaquée par les nématodes. D’année en année, les tiges deviennent plus courtes, les fleurs de plus en plus petites et plus pâles, et la dimension de votre plant diminue. Pour traiter contre les nématodes, nous utilisons l’iode et nous procédons avec la méthode par immersion – versez lentement la solution dans le sol autour de la pivoine pour que ça puisse pénétrer le plus possible, afin d’éliminer les champignons.
